
Important: This article is for informational purposes only. Please read our full disclaimer for more details.
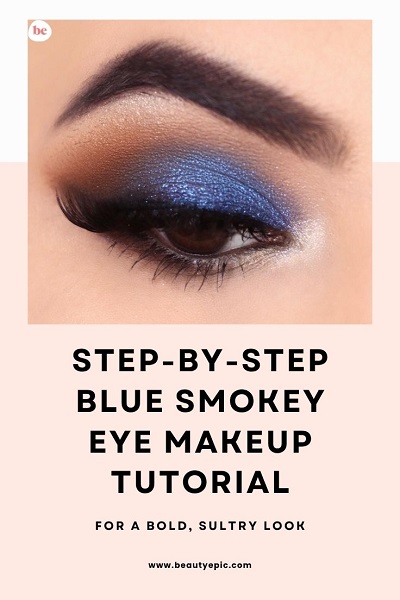
Looking to level up your makeup game with a touch of drama? A blue smokey eye is the perfect bold statement—edgy, sultry, and perfect for nights out, special events, or when you’re just in the mood to feel fierce. This tutorial breaks it down into simple, expert-approved steps that even beginners can follow.
Why Blue? The Power of Color
Blue eyeshadow isn’t just a retro trend—it’s making a big comeback with modern, wearable twists. From navy to cobalt and teal, blue hues flatter all eye colors and skin tones when applied with the right technique. It creates depth like a classic smokey eye, but with a pop that makes eyes stand out effortlessly.
Step 1: Prep Like a Pro
A clean, prepped canvas ensures long-lasting color and smooth blending.
- Start with skincare. Cleanse your lids and apply an eye-safe moisturizer or primer.
- Prime your lids. Use a dedicated eyeshadow primer to lock in the look. If your lids are oily, skip concealer and use a mattifying primer like Urban Decay Primer Potion.
- Set the base. Lightly dust translucent setting powder over your lid to prevent patchiness.
Pro Tip: Avoid sticky bases—especially if you’re working with vibrant blues, as they can cling unevenly and appear blotchy.
Step 2: Choose the Right Blues
Pick a palette with a range of blue tones plus complementary neutrals. We recommend:
- Transition shade: Soft taupe or light brown
- Main blue shade: Cobalt, sapphire, or navy
- Deepening shade: Charcoal or matte black
- Highlight: Pale shimmer or champagne
The Huda Beauty Sapphire Obsessions or NYX Ultimate Brights Palette are beginner-friendly and pigmented enough for a standout look.
Step 3: Define the Transition Zone
Your transition shade acts as the bridge between the bold blue and your brow bone.
- Use a fluffy blending brush to apply a warm taupe into the crease.
- Blend it in windshield-wiper motions for a smooth gradient.
- This helps prevent the blue from creeping too high and gives a more professional finish.
Step 4: Pack the Blue
Time for the main event—vivid, statement-making blue.
- Use a flat shader brush to pack the blue eyeshadow onto the mobile lid. Press, don’t swipe.
- Stop just below the crease.
- Build the pigment slowly instead of applying too much at once.
If you want to intensify the blue, lightly spritz your brush with a setting spray before picking up the pigment.
Step 5: Smoke the Outer Corner
For a smoky effect, depth is key.
- Take a dark navy or matte black shadow and apply it to the outer “V” of your eye.
- Blend it inward into the blue using a smaller blending brush.
- Focus on keeping the smoke low—don’t drag it too far up the crease.
Pro Tip: Blend the edges with your transition shade again to soften any harsh lines.
Step 6: Add Shine (Optional but Stunning)
Want a touch of glam?
- Apply a shimmer blue or silver shadow to the center of the lid using your finger.
- You can also pop a bit into the inner corner to brighten up the look.
This contrast between matte and shimmer brings dimension and light to your eyes.
Step 7: Define the Lower Lash Line
Smokey doesn’t stop at the lid.
- Smudge the same blue shadow along your lower lash line with a small pencil brush.
- Add a bit of dark shadow to the outer half for balance.
- Blend everything with a clean brush for that hazy, sultry effect.
Step 8: Eyeliner & Mascara Magic
- Line your upper lash line with black or navy gel eyeliner.
- Tightline your upper waterline to thicken the lash base.
- Apply a deep blue or black pencil to your lower waterline if you want full intensity.
- Finish with a generous coat of volumizing mascara or add falsies for extra drama.
Step 9: Clean Up and Highlight
- Use a makeup wipe or concealer to clean up any fallout or sharpen the outer edge.
- Highlight the brow bone and inner corner with a subtle shimmer or matte ivory shade.
Frequently Asked Questions (FAQ’S)
Q1: What lip color pairs best with a blue ssmokyeye?
A.Nude, mauve, or peach tones work best to balance the boldness of the eye look.
Q2: Can I wear a blue smokey eye during the day?
A.Yes, opt for lighter blues and skip the shimmer or black to tone it down.
Q3: How do I keep my eyeshadow from creasing?
A.Use a high-quality eyeshadow primer and avoid creamy concealers on oily lids.
Q4: What eye color does blue eyeshadow suit best?
A.Blue pops beautifully on brown and hazel eyes, but with the right undertone, it can work on all eye colors.
Blue smokey eyes aren’t just for the runway—they can be part of your everyday glam when done right. By following these steps and blending with patience, you’ll master the art of bold, seamless eyeshadow in no time. Try it once and don’t be surprised when people ask, “Who did your makeup?”—because the answer will proudly be: you did.


