![]() Fact checked
Fact checked ![]() We have a team of smart fact checkers. They make sure our content is accurate. They use the best sources like medical journals and government websites. You can find their names and profiles on the articles they check.
We have a team of smart fact checkers. They make sure our content is accurate. They use the best sources like medical journals and government websites. You can find their names and profiles on the articles they check.
Important: This article is for informational purposes only. Please read our full disclaimer for more details.
Micro-link hair extensions have become a go-to choice for people seeking length, volume, and a natural look without glue or heat. They’re versatile, reusable, and blend seamlessly with your hair. But before you book that appointment, it’s worth understanding exactly what you’re getting into.
What Are Micro-Link Hair Extensions?
Also called microbead, microloop, or I-tip extensions, these are individual hair strands attached to your natural hair using small metal or silicone-lined beads. No glue, heat, or sewing is involved, making them a relatively gentle option for many hair types.
How the Installation Process Works
Getting micro-link extensions is not a quick “in-and-out” salon service—it’s a meticulous process that requires precision, patience, and skill. Here’s what typically happens when you sit down in your stylist’s chair.
1. Consultation and Hair Prep
Before a single bead is applied, a professional consultation is essential. Your stylist will examine your scalp health, hair density, and strand thickness to determine whether your hair can handle the weight of micro-links. They’ll also help you choose the right extension hair in terms of texture, color, and length so it blends naturally.
On installation day, your hair will be washed thoroughly to remove oils, product buildup, and residue—clean hair ensures the beads grip properly. Conditioner is usually avoided at this stage, as it can make your strands too slippery for secure application.
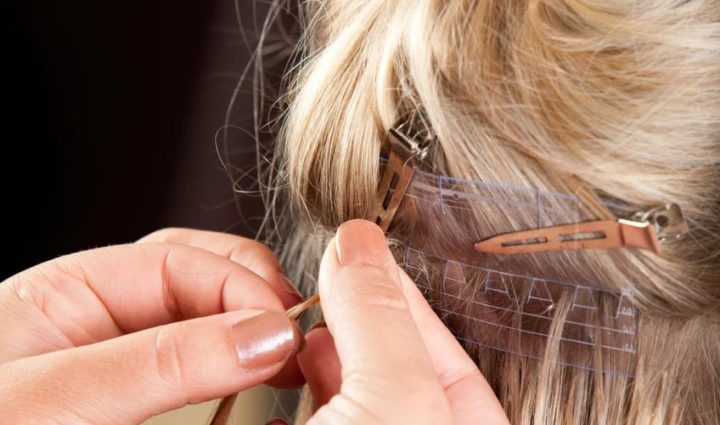
2. Sectioning the Hair
The stylist will part your hair into neat, horizontal sections starting from the nape of your neck. Working in small, controlled sections ensures each bead sits evenly and avoids unnecessary tension on your natural hair.
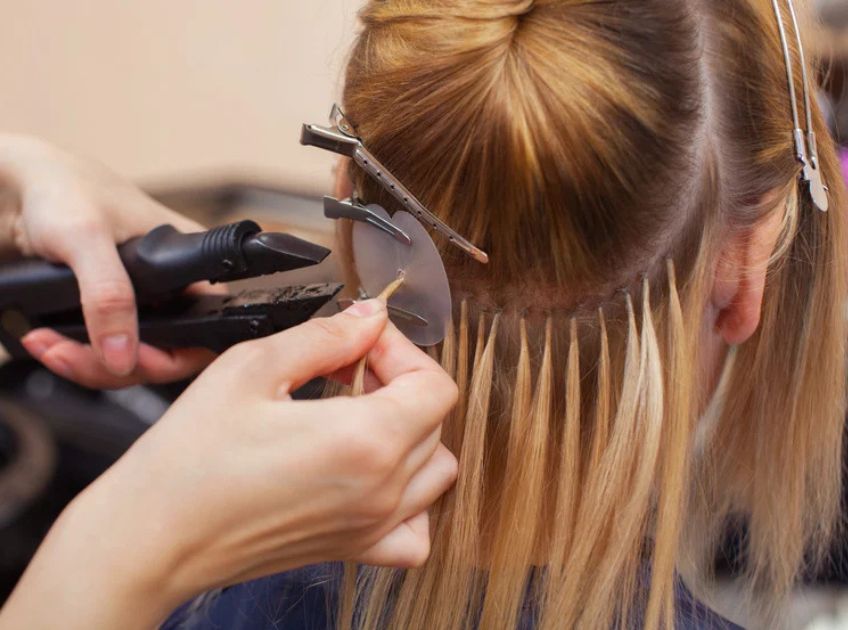
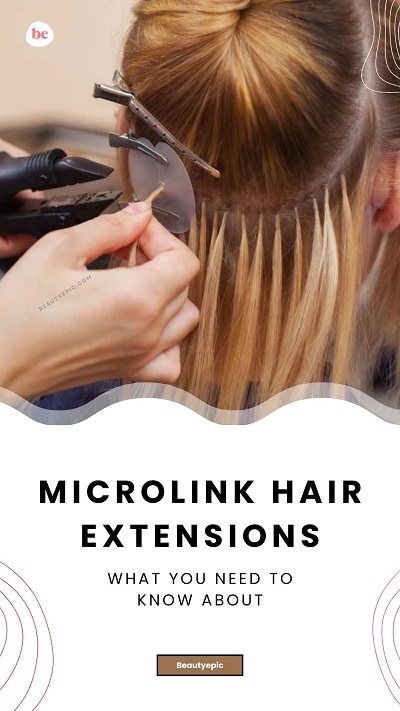
3. Applying the Beads and Extensions
A small section of your natural hair—about the thickness of a matchstick—is threaded through a tiny metal or silicone-lined bead using a special loop tool or pulling needle. Then, a single extension strand is inserted into the bead alongside your natural hair.
Once the strand is in place, the stylist uses pliers to clamp the bead shut, securing the extension without glue or heat. This process is repeated strand by strand, moving upward toward the crown.
4. Placement for a Natural Look
An experienced stylist will pay attention to bead placement so they remain hidden under your natural hair. The extensions are typically installed about half an inch from the scalp, allowing for natural movement and preventing scalp tension as your hair grows.
5. Blending and Styling
After all the beads are secured, the stylist will trim and shape the extensions to blend seamlessly with your natural hair. This might include layering, point-cutting, or light texturizing so there’s no obvious line between your hair and the extensions.
6. Aftercare Instructions
Before you leave the salon, you’ll be given detailed aftercare guidelines—how to wash, dry, and style your hair without loosening the beads. You’ll also be advised to schedule a maintenance appointment every 6–8 weeks to move the beads closer to the scalp as your natural hair grows.
A full installation typically takes 2–4 hours, depending on the amount of hair you’re adding. If you’re going for maximum volume or length, expect to be in the chair for the longer end of that range.
The Different Styles of Micro-Link Extensions
- I-Tip Extensions – Pre-bonded keratin tips shaped like an “I” for easy bead threading.
- Loop Extensions – Come pre-attached to a plastic loop for faster installation.
- Nano Bead Extensions – Smaller beads for an even more discreet appearance.
Weighing the Pros and Cons Before You Commit
Pros
- Natural look and movement
- No heat, glue, or chemicals required
- Can be reused with proper care
- Gentle on most hair types when installed correctly
Cons
- Time-consuming to install
- Requires regular maintenance every 6–8 weeks
- It can slip out if not cared for properly
- May cause tension if installed too tightly
Micro-Links and Textured Hair: Type 3 & Type 4 Insights
If you have curly or coily hair, micro-links can work beautifully when done by a stylist experienced in textured hair. According to hair science studies published in the Journal of Cosmetic Dermatology, hair density, curl pattern, and strand thickness should be considered to avoid excessive tension or breakage (1). Choosing extensions that match your texture ensures a seamless blend and easier styling.
Longevity and Cost: What to Expect
With good maintenance, micro-links last 2–4 months before needing adjustments. Prices vary by salon and hair quality but generally range from $500 to $1,500, including hair and installation. Maintenance appointments may cost $100–$300.
Is This the Right Extension Method for You?
You may be a good candidate if:
- You want a reusable, natural-looking option
- You’re willing to commit to regular salon visits
- You have healthy hair strong enough to hold the beads
- Those with extremely fragile or thinning hair may need a different method.
Insights & Scientific Backing
Trichologists (hair and scalp specialists) note that while micro-links are relatively low-damage compared to glue-in or sew-in methods, poor installation or neglecting maintenance can lead to breakage. A 2017 review in Dermatologic Therapy emphasized that hair extension safety largely depends on the stylist’s technique and aftercare (2).
Frequently Asked Questions (FAQ’S)
Q1. Can I wash my hair with micro-link extensions?
A. Yes—use a sulfate-free shampoo and avoid heavy conditioners near the beads to prevent slippage.
Q2. Do micro-link extensions damage hair?
A. When installed and maintained properly, they cause minimal damage. Improper care or excessive tension can cause breakage.
Q3. Can I style my hair as usual?
A. Yes—you can curl, straighten, or blow-dry, but always use heat protectant. Avoid high heat directly on the beads.
Micro-link extensions can give you the hair of your dreams—provided you choose a skilled stylist and commit to proper upkeep. They’re a versatile, reusable, and chemical-free option that works for many hair types, including textured hair. The key to long-lasting results is informed decision-making, regular maintenance, and professional installation.