Important: This article is for informational purposes only. Please read our full disclaimer for more details.
Have you been suffering from thyroid disorder? Have you tried out different prescribed medicines to cure this disorder but without any success? Well, if your answer is yes, then we think it’s time for you to try out some yoga poses. Yes, you heard us right! Yoga has been known to be the cure for a number of ailments, with thyroid being one of them.
In this post, we will show you 12 yoga poses which will not only treat your thyroid problems but will also help in preventing it from reoccurring.
Article Contains
12-Best-Yoga-Poses-to-Improve-Thyroid-Health
- Sarvangasana (Shoulder stand pose)
- Viparitakarani (Inverted Pose)
- Halasana (Plough pose)
- Matsyasana (Fish pose)
- Ustrasana (Camel Pose)
- Surya Namaskar (Sun Salutation)
- Bhujangasana (The Cobra Pose)
- Setubandh Sarvangasana (Bridge Formation Pose)
- Sirsasana (Headstand Pose)
- Dhanurasana (The Bow Pose)
- Shavasana (Corpse Pose )
- Shishu Asana (Child Pose)
12 Best Yoga Poses to Improve Thyroid Health
1. Sarvangasana (Shoulder stand pose)
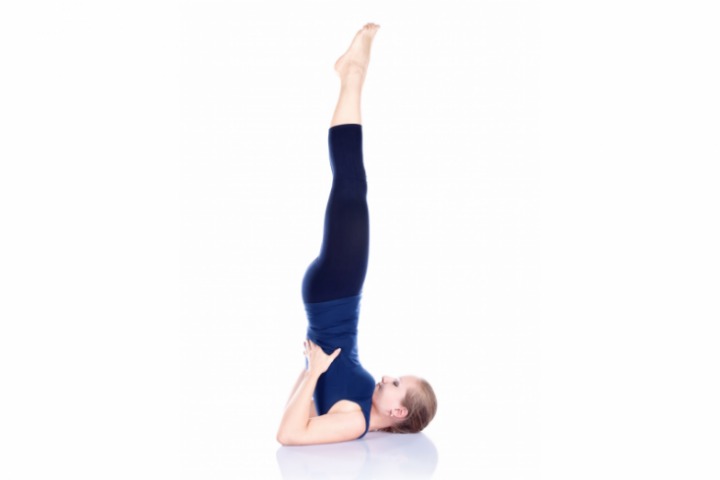
Also known as the shoulder stand pose, this is a total body workout which will strengthen all your inner body parts.
Instructions:
- Lie down on the yoga mat with your legs close together.
- Now raise your legs to 90 degrees angle and slowly lift your waist by pressing your palms to the floor.
- Hold your waist with your hands ensuring that you maintain the 90 degrees angle. Your body and legs should be in a vertical position.
- Your body’s weight should be resting on the shoulder blades and your elbows should be on the floor.
- Maintain the pose for 50 to 100 counts and then slowly lower your legs and come back to your first position.
Benefits:
- Because of the position of this pose, there would be more blood flow in the throat area which in turn will re-energize your thyroid glands.
- Your ears, nose and throat disorders would be taken care of.
Precautions And Contraindications:
Please ensure that you do not opt for this position if you are suffering from any of the following problems:
- Slipped disc
- Heart problems
- High blood pressure
- Spondylitis
- Middle ear problem
- Old age
Time Taken:
- Overall, this asana will not take more than 15 minutes for you to complete.
Repetitions:
- Ensure that you complete two rounds of this pose with adequate rest between each round.(1)
2. Viparitakarani (Inverted Pose)
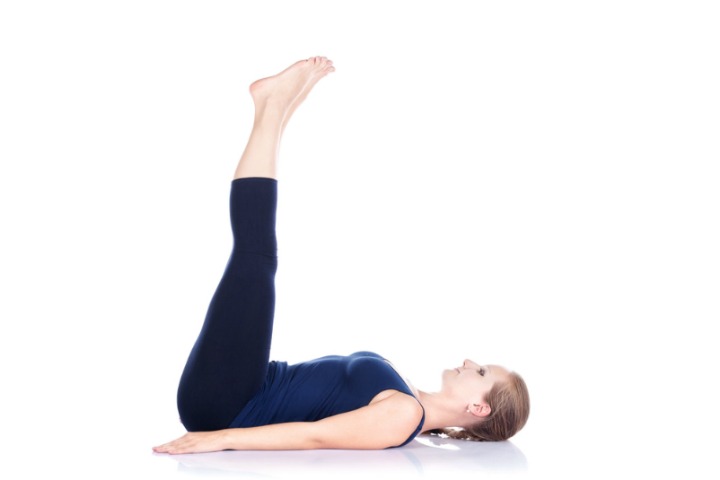
This pose is similar to the Sarvangasana pose, but it is done with the help and support of thick blankets or pillows or a round bolster. You will also have to use the wall as a support for this pose.
Instructions:
- Firstly you have to determine your position and distance from the wall. If you are taller then you can move farther from the wall and if you are shorter then you will have to be closer to the wall.
- Now place the bolster against the wall. Start by placing your left side against the wall and your lower back resting on the bolster.
- Using your hands for balance, shift your lower back onto the support and lift your legs.
- Lower your back on the floor and let your head and shoulders rest on the floor.
- With your palms facing upwards, rest your arms on the side. The bolster should be supporting your lower back.
- Gently release and relax your thigh bones.
- To end the asana, slowly move away from the wall, bring your legs down and gently sit up.
Benefits:
- The thyroid glands are stimulated as there is an increase in the blood flow in the neck area and thyroid glands.
- People suffering from hypothyroidism should try this as it helps in maintaining the balance and functionality of other endocrine glands.
- Vishuddhi chakra is a spiritual region of the neck which is associated with the thyroid glands. This asana helps in activating this area.
Precautions And Contraindications:
- Because of its inverted position, this asana should be avoided during menstruation.
- People suffering from eye problems like glaucoma should stay away from this pose.
- This asana is not ideal if you have back and neck problems.
Time Taken:
- Depending upon your body strength, you can do this pose daily for 5 to 15 minutes.
Repetitions:
- Two rounds of this pose is mandatory in your daily regime.
3. Halasana (Plough pose)
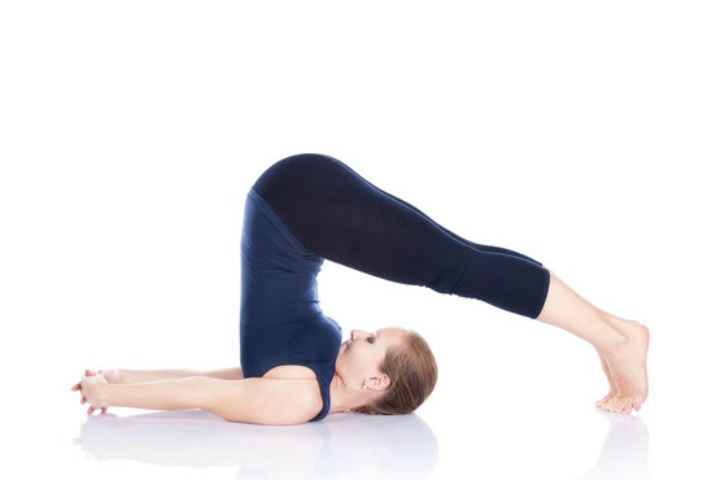
Though this is an advanced pose, it is quite easy to do and also has innumerable health benefits. Known as the plough pose, this yoga asana is quite effective in making your inner body parts healthy and strong.
Instructions:
- Keeping your legs close together, lie down on the yoga mat.
- Slowly raise your legs to 90 degrees angle.
- Next, keeping your hands on the side with the palms facing downwards, lift your waist and legs and bring it over your head. Try to touch your toes to the ground while keeping your legs straight.
- Balancing the weight on your shoulders, bring both the hands together and hold your head while relaxing the elbows.
- Hold the position for sometime and then gently bring your legs back.
Benefits:
- While doing the asana, the chin lock would put ample pressure on your thyroid glands which in turn will balance the metabolic rate.
- There should be a balanced thyroxin secretion in our body and the halasana pose is the best yoga option for this.
Precautions And Contraindications:
- Pregnant women should not try this asana.
- Women are advised not to practice this during their periods.
- Do not try this if you are suffering from hernia, high blood pressure, back/neck problems or slipped disc.
Time Taken:
- Start by holding the position for 10 seconds and then slowly increase it bit by bit till you are bale to maintain it for at least 3 minutes.
Repetitions:
- You can do 3 repetitions of this asana.
4. Matsyasana (Fish pose)
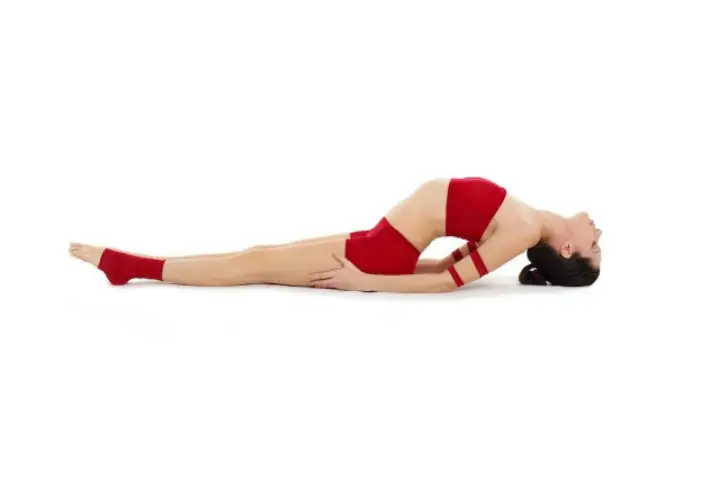
- Known as the fish pose, this is one of the most effective asanas to treat and prevent thyroid.
Instructions:
- Sit on the floor with your legs crossed; something like the Padmasana pose.
- Now you need to gently bend backwards until your head reaches the ground.
- While bending, you can also take your elbows help to support you.
- Once you are in the backwards position, you need to bring your hands in the front and hold the toes of your feet.
- After sometime, release the pose and come back to your original position.
Benefits:
- The posture of this asana will stretch and expand your throat and in turn your thyroid glands.
- With the improved blood circulation to the glands, you will find the effectiveness of this asana to be quite healthy and beneficial.
Precautions And Contraindications:
- This asana should be avoided during pregnancy and menstruation.
- Avoid this if you have high blood pressure, heart disease or hernia.
- Do not overstretch or turn your neck when you are in this position.
- If you are unable to reach your toes, you can place your hands on the ground or thighs.
Time Taken:
- The duration depends on how long you can hold the position without feeling any discomfort.
Repetitions:
- 3 sets of this asana would suffice.
5. Ustrasana (Camel Pose)
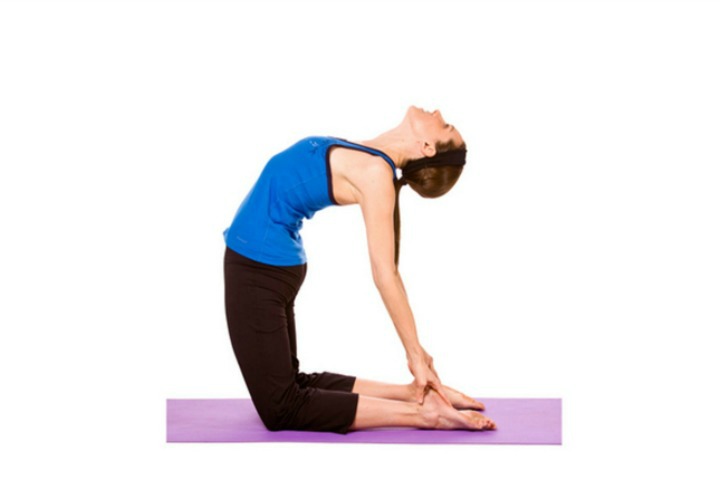
Ustra in Sanskrit means camel, which is why this pose is also known as the camel pose. Make sure that your stomach is empty before you start doing this asana.
Instructions:
- Kneel down on the yoga mat while keeping your hands on your hips.
- Your body has to be aligned properly and your feet should face the ceiling.
- Slowly inhale and arch your body backwards. Your hand should be holding your fet with your arms straight in line.
- Hold the pose for sometime and then release it.
Benefits:
- Practicing this asana will stimulate your thyroid glands and will help you in treating your thyroid problems.
Precautions And Contraindications:
- Do not perform this asana if you have neck, back or knee injury.
- This is not advisable if you have recently undergone any surgery.
- High or low blood pressure or migraine patients should not try this asana.
- Insomnia patients should also not perform this asana.
Time Taken:
- If you are a beginner, then do not hold this position for more than 20 seconds but if you are experienced, then you can hold the position for 60 seconds.
Repetitions:
- Repeat this asana twice.
6. Surya Namaskar (Sun Salutation)
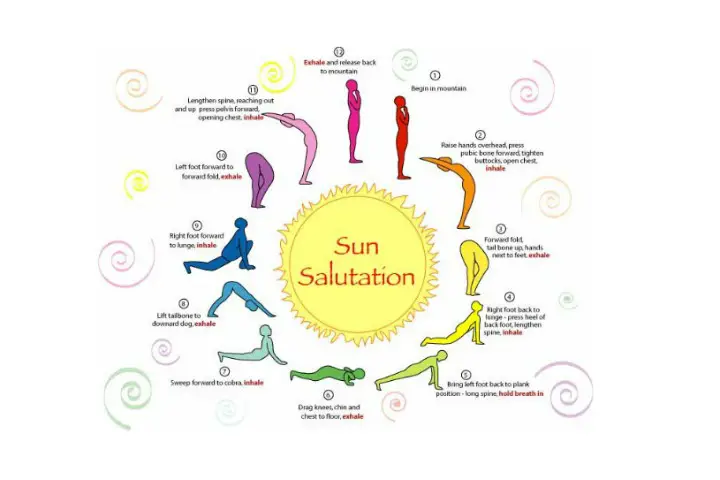
Surya namskar is a 12-step and one of the most well known yoga asana which warms up your body and makes you feel energized to proceed with the other asanas.
Instructions:
- Keeping both your feet together, balance your weight equally on both the feet. Breathe in and lift your arms upwards. Now, exhale and bring your palms in a prayer position in front of you.
- Breathe in deeply and stretch your arms upwards.
- Gently exhale while bringing your hands down slowly and touching the floor.
- In the next step, place your right leg forward between both your hands, stretch your lef leg with the knee touching the ground and keep your head straight.
- Hold the above position and then slowly bring the right leg back. Your body should be in a straight line now.
- In this step, your hands, feet, knees, chest and chin have to touch the floor.
- Now keeping your elbows bent, stretch your upper body upwards.
- The next step is to lift up your hips and tail bone and push your chest downwards where essentially you have to make an inverted V position.
- Repeat step 4, but instead of your right leg, place your left leg forward.
- Bend your body down from the waist and try to keep your palms on the floor.
- Once again, breathe in deeply and stretch your arms upwards
- Release your breathe gently and bring your arms downwards and end the asana with a straight body.
Benefits:
- By doing the surya namaskara, your endocrine glands specifically your thyroid glands would be normalized.
Precautions And Contraindications:
- If you have completed the trimester of your pregnancy, then it is best to stop doing this asana.
- Do not perform this asana if you are a hernia or high blood pressure patient.
- This is a strict no-no for patients with back problems.
Time Taken:
- The entire activity would take about 12-15 minutes.
Repetitions:
- 12 sets of this asana equals to 288 yoga asanas so doing the entire 12-step routine once is enough.
7. Bhujangasana (The Cobra Pose)
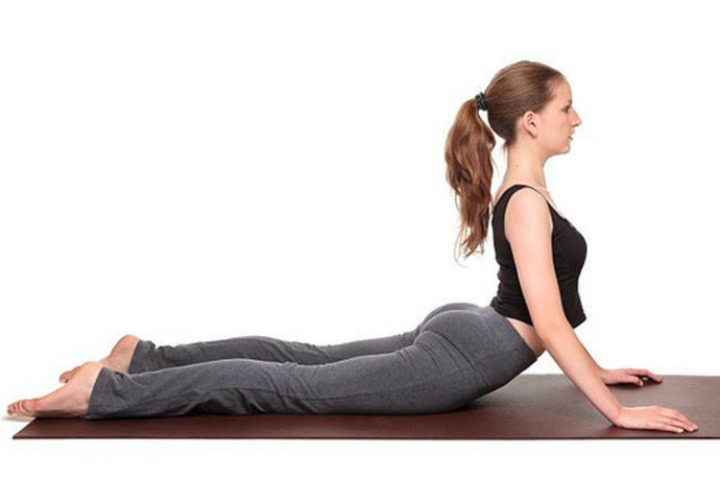
The bhujangasana or the cobra pose is also one of the steps in surya namaskara. This position resembles the shape of a cobra’s raised hood.
Instructions:
- Lie down on the mat with your stomach facing the floor. Keep your hands on the side and ensure that your legs are also together.
- Move your hands to your shoulder level with the palms touching the floor.
- Put your body weight on the palms and lift up your head and torso. Ensure that your arms at bent at the elbow level.
- Keeping your shoulder blades firm and away from your head, stretch your neck backwards.
- Your hips, thighs and feet should be in touch with the floor.
- To complete the asana, gently bring down your hands and let your forehead touch the floor.
Benefits:
- This yoga pose provides relaxation to your neck area which in turn relaxes your thyroid glands.
Precautions And Contraindications:
This asana is not advisable of you are facing any of the below problems/conditions:
Time Taken:
- Start by maintaining the pose for 15-30 seconds and slowly increase it to 2 minutes.
Repetitions:
- Repeat this yoga pose thrice.
8. Setubandh Sarvangasana (Bridge Formation Pose)
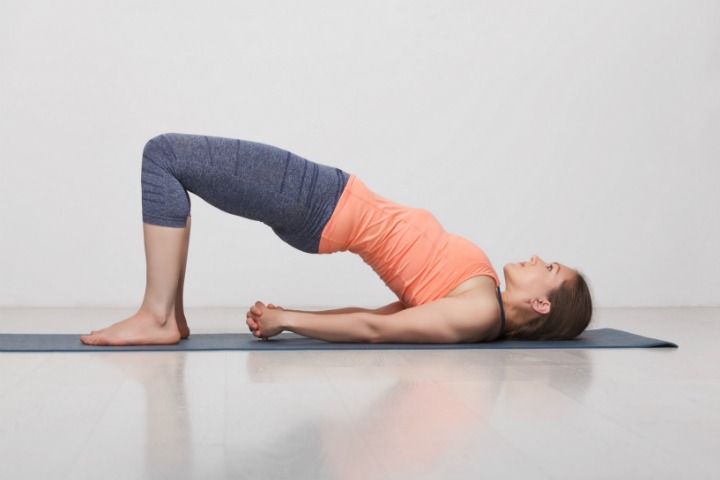
Resembling the structure of a bridge, in this pose, you will have to stretch your chest, neck and back.
Instructions:
- Start by lying down on the mat; flat on your back.
- Now, bend your knees and place your feet on the floor with a slight gap in between.
- Palms facing down, keep your arms beside your body.
- Try and lift your body off the floor and ensure that your chin is touching your chest while rolling your shoulders away from the spine.
- Inhale and exhale while maintaining the pose.
Benefits:
- With the right pressure on your neck region, your thyroid glands will be stimulated.
Precautions And Contraindications:
- If you are either suffering from back problems or some neck injury, then you shouldn’t try this yoga pose.
- You have to be really careful while rolling your shoulder blades. It has to be done gently and not forcefully.
Time Taken:
- You need to hold the pose for at least one minute for a positive result.
Repetitions:
- Doing this once or twice is sufficient.
9. Sirsasana (Headstand Pose)
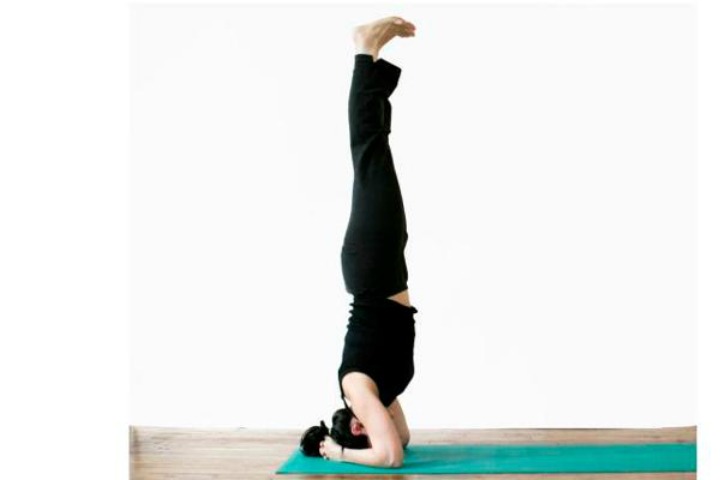
This is one of the toughest yoga poses and also slightly dangerous one. In order to perform this asana well, you need to have a lot of upper body strength.
Instructions:
- Before you start the asana, place a thick blanket on the floor which will cushion your head.
- Now place your arms on the floor, lock your fingers together with your inner wrists facing the floor.
- The next step is to lift up your body and have it perpendicular to the floor.Your head will be cushioned within your clasped fingers.
- Make sure that the entire weight is not on your shoulders. Keeping your tailbone firm, ensure both the legs are together and your whole body is aligned in a straight line.
- Exhale gently while releasing the pose.
Benefits:
- You can treat your thyroid by this yoga pose since it affects your thyroid glands directly.
- It balances the metabolic functions and keeps the thyroid glands healthy.
Precautions And Contraindications:
- Because of its complex nature, unless you are an expert, you should not try this yoga pose without a certified yoga instructor.
- People with back injury, neck injury, heart condition and high blood pressure should not perform this yoga asana.
Time Taken:
- While starting out you can maintain the pose for 10-15 seconds and slowly increase it to 2-3 minutes as per your comfort level.
Repetitions:
- You can do this asana just once.
10. Dhanurasana (The Bow Pose)
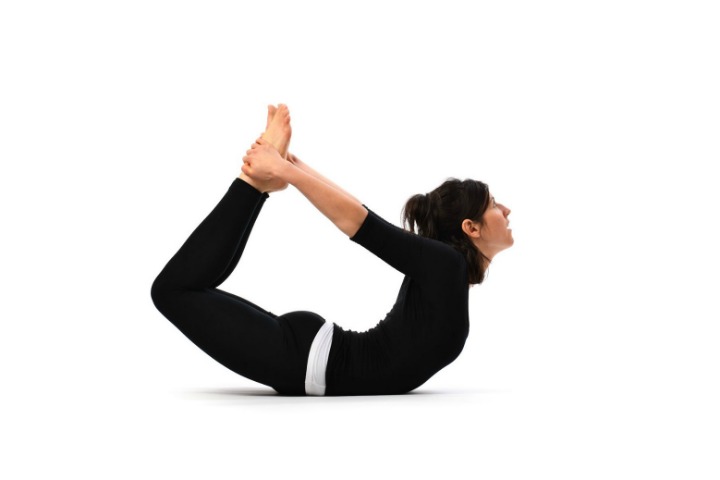
Considered as one of the main exercises for back stretching, the Dhanurasana is a great way to make your body strong and flexible.
Instructions:
- Lie down on the mat; flat on your stomach.
- Bring your knees up and hold your ankles. This position will create the shape of a bow.
- Gently inhale, pull your legs and try to lift up your chest from the floor.
- Keep your head straight and hold the pose.
- Continue to inhale and exhale while maintaining the position.
Benefits:
- Regularization of the secretion of adrenal glands.
- With more blood flowing through your glands, it balances the secretion of cortisone.
Precautions And Contraindications:
- Do not perform this asana if you are pregnant.
- Avoid this yoga pose if you are facing issues like hernia, high blood pressure, lower back pain, migraine, neck injuries or any surgery.
Time Taken:
- This might take a maximum of 5 minutes.
Repetitions:
- Perform this yoga pose twice with proper rest in between.
11. Shavasana (Corpse Pose )
This might seem like one of the easiest yoga poses but it takes a lot of mental strength to perform it correctly. This is the best way to relax after a strenuous session of yoga asanas.
Instructions:
- Lie down on a hard surface without the use of any pillows or bolster.
- You have to be in a state of complete relaxation. So keep your legs apart and relaxed.
- Let your arms be on the sides with the palms facing upwards.
- Now close your eyes and start taking deep breaths. The most important task would be to completely forget about your surroundings and just focus on your body and breathing.
- While doing this asana, ensure that you do not sleep off!
- Once you feel that your body is completely relaxed, slowly roll your body to one side with your eyes still closed.
- And now you can sit up and open your eyes and take notice of your surroundings.
Benefits:
- This is one of the best asanas for stimulating blood circulation.
Precautions And Contraindications:
- Unless you have some serious back problem, there is nothing else which can hinder you from performing this asana.
- Also, if you are pregnant, just make sure that you use a pillow to rest your head on.
Time Taken:
- 10-12 minutes would be appropriate.
Repetitions:
- You don’t have to repeat this asana. Doing it once would suffice.
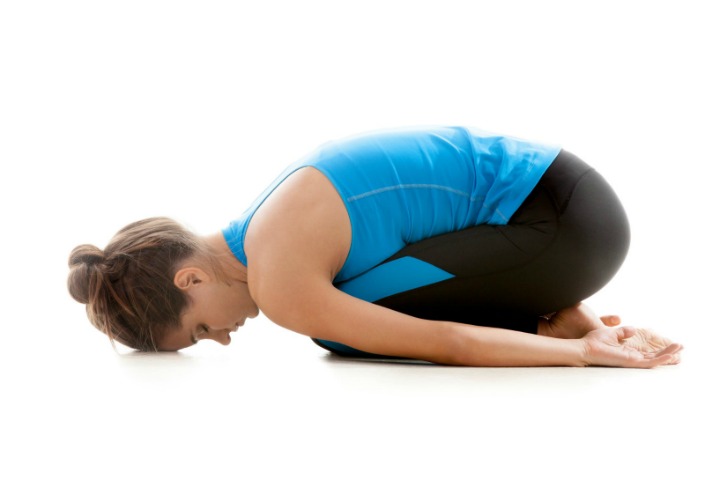
12. Shishu Asana (Child Pose)
This another pose which is quite easy to do and it also helps in relaxing your body and mind. A great asana to relive your back pan, this is usually done after sirasana.
Instructions:
- Start getting into the child-like position by first sitting on your heels and then slowly bend forward until you forehead touches the floor.
- Your arms will be pointing backwards with the palms flat on the floor.
- Now, slowly press your chest on your thighs and try to hold the position for sometime.
- To release, gently pull up your body and get back to the sitting position.
Benefits:
- Doing this asana will improve the blood circulation which will stimulate your thyroid glands.
Precautions And Contraindications:
- Pregnant women and people with back and knee injuries should avoid this yoga asana.
Time Taken:
- This will take about 2-3 minutes.
Repetitions:
- No repetitions required.
We hope these asanas will help you in overcoming your thyroid problems. Take care and stay healthy!
You Might Also Like:
- 10 Simple Yoga Poses for Back Pain
- 11 Best Yoga Poses To Boost Your Energy
- 10 Healthy Foods for Thyroid Function